Friday, March 24, 2017
Exchange Get VirtualDirectory cmdlets take a long time to run in Exchange Server
Exchange Get VirtualDirectory cmdlets take a long time to run in Exchange Server
In a Microsoft Exchange Server environment, you run one of the following cmdlets to obtain the properties of a virtual directory for a server in another site thats connected over a wide area network (WAN):
Get-WebServicesVirtualDirectory
Get-OwaVirtualDirectory
Get-ActiveSyncVirtualDirectory
Get-AutodiscoverVirtualDirectory
Get-EcpVirtualDirectory
Get-PowerShellVirtualDirectory
Get-OABvirtualDirectory
However, the cmdlet takes much longer than expected to run (about 15 minutes).
Workarond:
To work around this issue, use the AdPropertiesOnly switch with the cmdlet in the calls to the IIS metabase.
Example 1
Get-OwaVirtualDirectory -Server Contoso –AdpropertiesOnly
Example 2
Get-OwaVirtualDirectory -Identity "Contosoowa (default Web site)" –AdpropertiesOnly
The ADPropertiesOnlyswitch specifies that only the virtual directory properties that are stored in Active Directory Domain Services (AD DS) are returned.
For more information about ADPropertiesOnly switch, see Get-OwaVirtualDirectory.
Support KB 2896472:
https://support.microsoft.com/en-us/kb/2896472
Available link for download
Friday, March 17, 2017
Error Message The System Has Recovered from a Serious Problem
Error Message The System Has Recovered from a Serious Problem
Right-click My Computer.
Click Properties.
On the Advanced tab, in the Performance section, click Settings.
In the Virtual Memory section, click Change.
For Paging file size for selected drive, click No Paging File, and then click Set.
Click Yes after the following warning appears:
If the paging file on volume X: has an initial size of less than xx megabytes, then the system may not be able to create a debugging information file if a STOP error occurs. Continue anyway?
Click System Managed Size.
Click OK four times, and then restart the computer when you are prompted.
Available link for download
Thursday, March 16, 2017
Copy Blu ray ISO to Popcorn Hour A 500 Pro Media Player
Copy Blu ray ISO to Popcorn Hour A 500 Pro Media Player
Cloud Media have made available a new addition to their range of media players with the launch of the Popcorn Hour A-500 Pro. Which is powered by a Sigma Designs SMP8758 processor offering 2x Cortex-A9 cores @ 1.2GHz. The A-500 Pro processor is combined with Mali-400 MP4 graphics and supports HEVC decode and VXP, together with 2GB DDR3 RAM. If you have an .iso image file create from ImgBurn, Disk Utility, or download the ISO/IFO file from online websites, you can burn it to a disk or play it on computers, but dont expect to stream Popcorn Hour A-500 Pro Media Player, as its not a streaming media format and you can see its not a Popcorn Hour Media Player frinedly format.
In case that your Blu-ray and DVD ISO files are not viewable on Popcorn Hour A-500 Pro Media Player, youd better convert your iso to Media Player supported format for playing. This can be done by Pavtube ByteCopy which is ease of use with reasonable price and fast speed. Probably the main feature is multi-track preservation which means you can backup your Blu-ray/DVD to lossless mkv files with all multiple audio and subtitle tracks, and chapter markers keeping. I am a home user and I have a Popcorn Hour A-500 Pro Media Player, and I only choose ByteCopy to rip my Blu-ray, DVD, IFO files and store the rip versions on a hard drive for easy viewing on HDTV. Here is the reivew.
Now go to try the trial version to experience what it can do for you. Here let me show you how to convert Blu-ray to HD MP4 format for Popcorn Hour A-500 Pro Media Player step by step. Before going on, please make sure having downloaded and installed it. Note: Pavtube ByteCopy for Mac is made for Mac users)


Other Download:
- Pavtube old official address: http://www.pavtube.cn/bytecopy/
- Cnet Download: http://download.cnet.com/Pavtube-ByteCopy/3000-7970_4-76158512.html
Streaming Blu-ray ISO to Popcorn Hour A-500 Pro Media Player
This guide uses Blu-ray Ripper for Windows (Including Windows 10) screenshots. The way to rip Blu-ray ISO on Mac OS X El Capitan is almost the same. Just make sure you’ve downloaded the right version.
Step 1. Load ISO files.
Launch the program Run Pavtube ISO to Popcorn Hour Ripper, click “Load file” to choose Load IFO/ISO file. It will recognize the ISO image file automatically so that you will not have to run virtual drive to mount the ISO any more.

Note 1: Check the “Merge into one file” on the main interface; you will get multiple selected titles into one output file. It merges not only the chapter in to a title and file but also merges the titles in to one file.
Note 2: When playing Blu-ray ISO, the PopCorn Hour A-500 plays the MAIN FEATURE ONLY. If you copy Blu-ray to .m2ts streams, you can copy the main feature only, leaving out menus and extras. This will save some storage for you.

Note 3:As there is no equivalent ImgBurn for Mac OS X El Capitan, if you want to turn Blu-ray to PopCorn Hour A-500 playable videos on Mac, just store your Blu-ray into BDMV folder on Mac or backup Blu-ray to m2ts on Mac or copy Blu-ray to lossless mkv on Mac.
Step 2. Choose MP4 format.
In the dropdown list of “Format”, there are a mass of video format. You can choose “HD Video -> H.264 HD Video (*.mp4)” directly or choose the desired portable devices which is the best streaming format via Popcorn Hour Media Player. Just choose according to your own needs.

Tip:
1. If you want to get output blu-ray video keeping multiple audio tracks, multiple subtitles and with with lossless quality, you can choose “Multi-track Video” > “Lossless/encoded Multi-track MKV(*mkv)” format.
2. You are also allowed to change the video and audio parameters like codec, bitrate, channels, frame rate, etc. You can adjust it according to your demand or keep it default for output.

Step 3. Convert Blu-ray ISO to MP4.
Click the “Convert” button to start converting ISO to MP4 format. With the technology of CUDA acceleration it will provide you fast conversion speed. Once completed, go to “Open” the generated MP4 files. Now you can connect to an HDTV using an HDMI cable and access the Internet with either a direct connection to a router or by joining a home network like DLNA, just get your Blu-ray ISO playback on your Popcorn Hour A-500 Pro Media Player with ease.
Note: You can also backup your Blu-ray movies for viewing on KDLinks media player and AC Ryan Player.
Read More:
- Convert FLV MKV MTS MP4 WMV AVI to Blackberry Z10/Z30 in a Simplest Way
- Stream videos from my DSLR on NAS to PS3 for playback
- Stream all your Video from PC to Xbox One
- Play M2TS with Plex media server via Mac OS X El Capitan
- View DVDs on HD TV for Playback via Mede8er Multimedia Player
Available link for download
Tuesday, March 7, 2017
Fast Solution to Problem apps can be accessed ok and then after a short time revert to desktop how can I fix
Fast Solution to Problem apps can be accessed ok and then after a short time revert to desktop how can I fix
apps can be accessed ok and then after a short time revert to desktop, how can I fix?
title contains full problem.
apps tiles are displayed ok on desktop and when any tile is clicked (i only have access via mouse) app opens ok allows me to see it fully and then disappears to its tile on desktop.
will appreciateany help.
Keys to the Problem apps can be accessed ok and then after a short time revert to desktop, how can I fix?
Download SmartPCFixer for Free Now
To check for Windows updates
- Open Windows Update by clicking the Start button Picture of the Start button, clicking All Programs, and then clicking Windows Update.
- In the left pane, click Check for updates, and then wait while Windows looks for the latest updates for your computer.
- If any updates are found, click Install updates. Administrator permission required If you are prompted for an administrator password or confirmation, type the password or provide confirmation.
Recommended Method to Fix the Problem: apps can be accessed ok and then after a short time revert to desktop, how can I fix?:


How to Fix apps can be accessed ok and then after a short time revert to desktop, how can I fix? with SmartPCFixer?
1. Download Error Fixer. Install it on your system.

2. After the scan is finished, you can see the errors and problems which need to be repaired.

3. The Fixing part is done, the speed of your computer will be much higher than before and the errors have been removed.

Related: error message fsui.exe/ wlidcli.dll is missing
,Solution to Error: Excel: Automatic number generation
,Troubleshoot:i wanna change language of all windows in Windows 7 Home Premium
,Troubleshooting:IF Function, if the vendor ID in column A matches any of the vendor IDs in column F, I want 1099 to appear in column D. Error
,Fast Solution to Problem: ReadyBoost is not working properly in my computer
,Troubleshoot:Error: "0x81000032 make sure the C: drive is online and set to NTFS" when trying to backup to external hard drive. Error,External Hard Drive not listed in Windows 7 backup wizard Tech Support,Tech Support: Im always being signed off so annoying,Solution to Problem: Impossible to use Internet Explorer! I keep getting the same error message every time i try to use IE.,Referencing data in Access using Excel [Anwsered],Need Best Way To Present Data [Anwsered],Same question but for windows 7 home edition,sometimes fullscreen wont activate [Solved],Solution to Error: We bought a new computer with windows 7 and it is constantly freezing. How do we fix this?,Solution to Error: Windows 8 update crash (2013-07-22),brclr.dll.mu_ Missing Error Fixer,How To Resolve Missing fin_myagtui.eng Problem,Corrupted f_0006ad File - How to Fix,nkebigvg.cpl Not Found Error Fixer,Corrupted olcontrols.ocx File - How to Fix
Read More: Solution to Problem: Allocation of Items in Excel,[Solution] Any one please help me to find out email service provider?,Troubleshooting:Any workarounds for no 64-bit Canon printer driver?,How Can I Fix - Apple TV wont connect with iTunes in Win 7 64 bit?,How to Fix Problem - Am logged on to the Wa State Empl page but cannot get the check boxes on the application to show up on my computer. My computer is a Toshiba Laptop, running MS Windows XP Home Edition 2002. I have pop up blocker turned off.?,After Windows Update CD/DVD drive does not work,After installing windows 7 to laptop the labels print out of line how can I fix it,After my computer sleeps the wireless always disconnects and will no reconnect,After signing into Pogo.com, I get a message" This tab has been recovered"....what does this mean and how do I fix it.....,All desktop icons changed to windows live and does not open
Available link for download
Sunday, March 5, 2017
Exchange Your Administrator has made a change and requires you to restart Outlook
Exchange Your Administrator has made a change and requires you to restart Outlook
If you are facing this kind of problem on Exchange and outlook there are severar reason fo that.

1. At first you can download this tool and evaluate any Office 20XX client problems
Office Configuration Analyzer Tool (OffCAT) information
https://support.microsoft.com/en-us/kb/2812744
https://www.microsoft.com/en-us/download/details.aspx?id=36852
The problem arises when an Outlook client connects to the CAS array and initially, if outlook connects to the CAS array member that contains the PF role, then Outlook converges all connections and displays both the Public and Private logons as one single connection (the CAS array name). When the Clients IP address changes, and it Re-connects, if it gets connected to a CAS array member that does not have the PF server, then we get an ECwrong server Response from Exchange, Outlook in its reconnect logic Cannot follow the Redirection Result that contains the correct PF server name, and displays the Error "The Administrator has made a change that requires you restart Outlook"
2. Mitigations:
You have the option to completely suppress the dialog:
How to suppress the pop-up "The Microsoft Exchange administrator has made a change that requires you quit and restart Outlook" in Outlook 2010
• Uncheck the option “Show Microsoft Exchange Messages” from the Outlook icon on taskbar, and test the behavior.
This setting is controlled by the registry value..
HKEY_CURRENT_USERSoftwareMicrosoftOffice14.0OutlookDisplay TypesBalloons
Name: Exchange
Type: DWORD
Value: 1 (on) / 0 (off)
3. It could be related to Public folder problem
https://msexchange.me/2014/04/20/the-microsoft-exchange-administrator-has-made-a-change-that-requires-you-quit-and-restart-outlook/
https://exchangemaster.wordpress.com/tag/the-microsoft-exchange-administrator-has-made-a-change-that-requires-you-quit-and-restart-outlook/
https://msexchange.me/2014/04/20/the-microsoft-exchange-administrator-has-made-a-change-that-requires-you-quit-and-restart-outlook/
http://paulroman.pras.ro/2012/08/the-microsoft-exchange-administrator.html
4. If you put in standby your pc and outlook is not correctly closed autodiscover and pc wake un can give you that alert
[update 2016.05.18]
5. Here is an interesting article that explain ADSI edit check to view if Exchange DB references to wrong Public Folder DB
https://jaapwesselius.com/2014/08/05/the-microsoft-exchange-administrator-has-made-a-change/
[UPDATE 2016.05.30]
On a DAG Exchange 2010 configuration here is an interesting article that indicate public folder wrong configuration was the main problem, in my case was the correct answer.
On a Exchange server PF was correctly configured with replication, on the other one PF was not well configurated replication, once done that everythings worked better.
http://www.msexchangegeek.com/the-microsoft-exchange-administrator-has-made-a-change-that-requires-you-quit-and-restart-outlook/
Available link for download
Sunday, February 26, 2017
Create a Bootable USB Pen Drive for win 7
Create a Bootable USB Pen Drive for win 7
- Insert your USB (4GB+ preferable) stick to the system and backup all the data from the USB as we are going to format the USB to make it as bootable.
- Open elevated Command Prompt. To do this, type in CMD in Start menu search field and hit Ctrl + Shift + Enter. Alternatively, navigate to Start > All programs >Accessories > right click on Command Prompt and select run as administrator.
- When the Command Prompt opens, enter the following command:
DISKPART and hit enter.
LIST DISK and hit enter.
Once you enter the LIST DISK command, it will show the disk number of your USB drive. In the below image my USB drive disk no is Disk 1. - In this step you need to enter all the below commands one by one and hit enter. As these commands are self explanatory, you can easily guess what these commands do.SELECT DISK 1 (Replace DISK 1 with your disk number)CLEANCREATE PARTITION PRIMARYSELECT PARTITION 1ACTIVEFORMAT FS=NTFS(Format process may take few seconds)ASSIGNEXITDon’t close the command prompt as we need to execute one more command at the next step. Just minimize it.
- . Insert your Windows DVD in the optical drive and note down the drive letter of the optical drive and USB media. Here I use “D” as my optical (DVD) drive letter and “G” as my USB drive letter.
- Go back to command prompt and execute the following commands:
6.1. Change directory to the DVD’s boot directory where bootsect lives:
d:
cd d: oot
6.2. Use bootsect to set the USB as a bootable NTFS drive prepared for a Vista/7 image. I’m assuming that your USB flash drive has been labeled disk G: by the computer:
bootsect /nt60 g:
(Where “G” is your USB drive letter) - Copy Windows DVD contents to USB.You are done with your bootable USB. You can now use this bootable USB as bootable DVD on any computer that comes with USB boot feature (most of the current motherboards support this feature).Note that this bootable USB guide will not work if you are trying to make a bootable USB on XP computer.
Available link for download
Saturday, February 25, 2017
Finding a Solution For Data Recovery low cost
Finding a Solution For Data Recovery low cost
Finding a Solution For Data Recovery low cost
If you find yourself with the vital task of restoring the lost information, check out the cheap data recovery solutions. Not everyone has money in his pocket, there are ways for you to recover lost data. Whether it was due to a power failure or you accidentally pressed, there is no help. Who does not know this, so there is no reason to be angry. Its part of life in a world of technology where we can rely on many of our electronics work and our lives. Then, when the party is over shame, because looking at the cheap data recovery solutions for the computer. There are several programs available to return to recover the data on your computer. One is the search, the product is particularly suitable for the problem. Forgot a project you were working? Find something like Pandora Recovery to save the day. There are many kinds of free programs available to help, but not all work the same way. To download something useless, read reviews to help you with your decision. Just because its free does not mean it can not work. The stigma and seek a solution that is affordable. If you are looking for a computer company for service, be sure to check references and statistics. If you do not want a bigger bill than initially noted to be caught. It may also be important to read all the fine print, because a lot of hidden business costs, without you knowing it be added, be. Just because you need an update is not available, it can not be careful. There are options for the restoration of economic data that are cost effective. Do not lose hope because there are free programs or companies providing services to have to recover your data to its rightful place.
Available link for download
Thursday, February 16, 2017
Create a Hidden User Account in Windows 7
Create a Hidden User Account in Windows 7
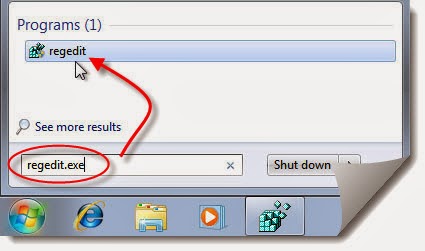
- Run Registry Editor (RegEdit.exe).
- Navigate to the following registry key:HKEY_LOCAL_MACHINESOFTWAREMicrosoftWindows NTCurrentVersionWinlogonSpecialAccountsUserList
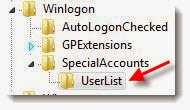
- Note: If SpecialAccounts and UserList is not found, create new sub-key and name them accordingly.
- Select UserList, and in the right pane, right click on any blank space, and point to New -> DWORD (32-bit) Value.
- Name the new DWORD registry value name as the exact same name that match the name of the user account to be hidden.For example, if the user ID of the user account is John, the name the registry value as John.
- Double click on DWORD registry value, and set the value data to 0 in oder to hide the account from Welcome Screen.Tip: To display the user account on Welcome Screen again so that it’s visible again, delete the registry entry, or set the value data to 1.
- Exit Registry Editor.
- Log off or restart computer to make the change effective.
Available link for download
Tuesday, February 14, 2017
Fix “Windows was unable to find a certificate to log you on to the network”
Fix “Windows was unable to find a certificate to log you on to the network”
Windows was unable to find a certificate to log you on to the network


Available link for download
Sunday, February 12, 2017
Data recovery experts see increased data loss during a recession
Data recovery experts see increased data loss during a recession
Data recovery experts see increased data loss during a recession
Data integrity has been compromised in many companies due to increasing cases of human error, they showed that these companies are trying to reduce IT costs, reducing the side and cut back their budgets. The results of these cost reductions have reduced the number of errors and increased staff revised the loss of important data.
The company specializes in data recovery have been reported, requested an increase to 100% as an emergency economic recession caused companies worldwide to tighten their belts. Many have experienced the same phenomenon in the last recession of the late 1990s represented, and this led to a business strategy similar to cost-cutting and downsizing. Request for assistance to a large extent related to the business-critical systems such as databases and mail servers.
They also reported an alarming increase in these losses associated with the increased use of virtual hard disks in the system office. Experts have shown that in many cases the data that they were involved in the implementation of IT, information workers accidentally dropped on the virtual disk, having learned that there is no backup to restore all deleted data in other parts of the system.
Trends in data recovery consists of the movement of people use computers smaller carriers such as memory cards, laptops, USB-memory cards and data cartridges. The increasing complexity of mobile technology and personal digital assistants (PDA) - especially players such as iPhone, has many "applications" for more clients, the problems get out of the necessary data from your mobile device.
Fortunately, technology, risk of data loss from the change and development, therefore, means that important information, with advances in software for data recovery, which made all the time. Such tools make the job easier, but it can not be stressed enough that they are not used or untrained amateurs. To recover the data reliably, it is important that the client use the services of professional services.
Kim is an expert writer to write articles on topics such as the various technologies, including backup and recovery
Data recovery experts see increased data loss during a recession
Available link for download
Tuesday, February 7, 2017
Could not Logon to Windows as it asks for a Smart Card that I have never Used
Could not Logon to Windows as it asks for a Smart Card that I have never Used
Solution: This happened because I accidentally configured my Windows system to allow only smart card logon.Smart Cards are a portable, secure and a tamper-proof way to provide security solutions for tasks such as client authentication, logging on to domains, code signing, and securing e-mail. You can use smart cards to also log on to your Windows 7 / 8 computers.
You may find the same error or logon option sometimes with Remote Desktop Connection.Here are some picture I want to share with you that you may see when encounter any such problems.
 |
| Smart Card Login |
 |
| Smart Card Login |
 |
| Smart Card Login |
 |
| Smart Card Login |
If a problem prevents you from logging in to Windows with a smart card, start your computer in safe mode and disable this security feature.Smart Card Login option will not be available in Safe Mode. Whether you log in with a physical or virtual smart card, Windows stores your settings in the Windows NT Registry. If youre able to log in to Windows, you can disable smart card login for future sessions by editing your local group policies. Disabling the Smart Card Plug and Play service removes the option to insert a smart card when logging in.
1. First of all log in to Windows in Safe mode, this can be achieved by pressing F8 key while the computer is booting.
2. From the options available, pick Safe mode with networking and hit Enter. Then log on to the computer by using administrative credentials.
3. Press Windows Key + R combination, type Regedt32.exe in the Run dialog box and hit Enter to open the Registry Editor.
4. Navigate to the following key:
HKEY_LOCAL_MACHINESoftwareMicrosoftWindowsCurrentVersionPoliciesSystem
 |
| Disable Smart Card Login |
 |
| Disable Smart Card Login |
6. In the Value Data field, change the current value of “1” to “0” and click “OK.”
7. Close Registry Editor and restart your computer in normal mode. The login screen prompts you to enter your username and password rather than insert a smart card.
Note: - Do note that this settings will be reset back to the default setting which is Value ‘1’, after 90 minutes, when the next Group Policy refresh takes place.
Disable Smart Card Plug and Play Service
1. Press Windows Key + R combination, type gpedit.msc in the Run dialog box and hit Enter to open the Local Group Policy Editor.
2. Navigate to "Computer Configuration>Policies>Windows Settings>Local Policies>Security Options>Interactive logon: Require smart cards"
 |
| Disable Smart Card Login |
 |
| Disable Smart Card Login |
5. Right-click “Turn On Smart Card Plug and Play Service” and select “Edit.” In the Properties dialog, select “Disabled” to turn off this service and remove the smart card option from the login screen. Click “Apply” and “OK” to save your changes.
For detailed information on Smart Card policy implementation read the following articles.
https://technet.microsoft.com/en-us/library/ff404287(v=ws.10).aspx
https://technet.microsoft.com/en-us/library/cc757921(WS.10).aspx
Incoming Search Terms
smart card
windows login screen
windows needs smart card to login
login issue
no smart card
can not login
disable smart card login
force smart card login
remote desktop need smart card to login
Available link for download
DVD to FCP X Import Video from a DVD into Final Cut Pro X
DVD to FCP X Import Video from a DVD into Final Cut Pro X
Wanna rip DVD to FCP X to Stream more easily? Here, we offer you three ways of putting DVD to FCP for editing on Mac OS X El Capitan, Juts choose the way as you like.
Part One: Professional Way of Import DVD discs to Final Cut Pro (FCP 6/7/X) on Mac OS X
Do you have any great idea to convert your DVD video? Sure! DVD video does not natively work within FCP X. To fix this issue, DVD video fiels must be ripped off the disc and then converted. This process works to rip DVD video for use in Final Cut Pro X. To rip DVD to FCP X, you will need a DVD ripping software. The best program for converting DVD to FCP X is Pavtube BDMagic for Mac (Now 30% off discount). With it, we can effortlessly rip DVD to Apple ProRes MOV format for further editing within Final Cut Pro 6/7 and FCP X on Mac (El Capitan and Yosemite included) without quality loss. Now download this program and follow this guide below to complete your task. Read the review.
Besides FCP X, This versatile DVD to FCP X Converter can also rip Blu-ray to H.264 MP4, Premiere Pro, Avid MC, iMovie, Sony vegas Pro, Premiere Elements, etc video editing programs. If you want to play Blu-ray movies on smartphone, tablet, Smart TV or other media player. Just trying our Blu-ray to Final Cut Pro Converter. This software can help you rip and convert Blu-ray to any video/audio format to fit your needs.
Free Download top Mac DVD to FCP X Converter:


Other Download:
- Pavtube old official address: http://www.pavtube.cn/blu-ray-ripper-mac/
- Cnet Download: http://download.cnet.com/Pavtube-BDMagic/3000-7970_4-76177782.html
Note: For people who want to edit DVD in FCP X keeping the multiple audio/video track separately as original,Pavtube ByteCopy for Mac (Now 30% off discount) is a powerful tool to transcode DVD to multi-track Apple Prores codec. Suppose you are good at both English and Francia, and want to preserve both of them from original DVD discs when converting, this app will be your best choice. (Here is a detailed guide for you).
How to Convert DVD movies to ProRes 422 for Final Cut Pro X?
Step 1. Load DVD movie.
Download the best DVD to FCP X Converter for Mac, install and run the Mac app. Or you can Insert Blu-ray to disc drive, click the “Load disc” button to import source Blu-ray.

Note: Pick one audio track and subtitles in the drop-down list of Audio and Subtitles. You are free to preview DVD movie in the right preview window to check if you get the correct audio track and subtitles.
Step 2. Select output format.
1)Choose the suitable output format from the “Format” menu, and here choose “Final Cut Pro > Apple ProRes 422(*.mov)” as output format for FCP X. Note: If you are a FCP X user, before you try to do the conversion, dont forget to make sure that you have installed the Apple ProRes Codec manually since the FCP X asks users to install it by themselves.

Tip: You can click settings button on the main interface of the DVD Ripper to customize the output parameters, set the resolution or bitrate as you want, you can also keep them as default.

Step 3. Start ripping DVD movies to ProRes 422 for FCP X.
Double check all press and hit the “Convert” button to start ripping DVD movies to Final Cut Pro X compatible Apple ProRes format on Max OS X El Capitan. Once the conversion finishes, import the ripped video files to FCP X and edit them to get your own video clip with ease.
Additional Tips:
If you want to convert both videos files like MTS, AVI, WMV, MKV, FLV, VOB, MXF, etc. and DVD/Blu-ray to Final Cut Pro supported ProRes codec, just turn to iMedia Converter for Mac, which can convert various video formats and DVD/Blu-ray to ProRes codecs on Mac.
Part Two: How To Bring DVD Video Into Final Cut Pro X?
Bringing DVD footage into Final Cut Pro X is simple! Convert your DVD footage with the free application, MPEG Streamclip, by transcoding it into a format that works natively within your non-linear video editing application (Premiere, AVID, Final Cut Pro X).
Ripping media off a DVD to insert in your video project does not have to be a tricky process! Because DVD video does not natively work within FCPX, DVD video files must be ripped off the disc and then converted. This process works to rip DVD video for use in any editing application, but in this example we’ll optimize for Final Cut Pro X. Follow these simple steps:
1. Download Squared 5?s free video conversion software, MPEG Streamclip (Streamclip is an industry favorite for converting a multitude of video formats and codecs). Install the application on your system.

2. Open MPEG Streamclip and then open your DVD in the application (from the menu bar, File > Open DVD…)

3. Select the Video_TS folder (this contains the main video).

4. MPEG Streamclip will open up your DVD video in the application. Just like the shortcuts for Final Cut Pro (and FCPX) you can set the in and out points of the video you’d like to export by using the shortcuts “I” and “O”.

5. MPEG Streamclip will let you convert your DVD to a wide variety of video formats. Choose the format that best matches your project settings (ie what your timeline is set for). ProRes (Apple’s intermediate codec optimized for post production) is typically a good choice for converting your DVD video.

6. Crank your quality setting up to 100%. Although you have a multitude of options for customizing export out of MPEG Streamclip, typically all other defaults will suffice for a standard DVD conversion.

7. Import your clips into Final Cut Pro X and get to editing!

Part Three: How to rip a DVD with HandBrake & import to FinalCut Pro
1.Insert the DVD and open Handbrake (icon looks like a Cocktail with a Pineapple).

2. Navigate to the VIDEO_TS folder in the DVD.
- Handbrake should recognize and select your DVD video contents in a Finder Window bearing your videos title.
- The highlighted folder will have the name "VIDEO_TS". Click in the Finder Window
- If not, click on "Source" in the HandBrake window, and choose the VIDEO_TS folder
- HandBrake will scan the folder (2-3 minutes)
- When its done go to the Title drop-down menu and choose the file you want to convert. HandBrake will default-select the largest file.

Handbrake will auto- matically search for DVD video contents and choose larg- est file (usually the main one). If you want a section you can choose it from the Title pull-down menu.
3. Once open you can configure the settings. Destination is the path and file name it will be given.

Format allows user to choose the video format – not very important since we will need to convert it before importing anyways. More advanced options are offered for video and audio compression, quality, chapter divisions, etc. These can be left as the default. To begin ripping, click “Start”. Progress will be shown on the bottom of the window.
More on Settings
- On the right-side of the upper menu bar click the "Toggle Presets" icon
- If you want to insert into Final Cut or playback on a computer (in a presentation, etc.) then choose "Normal" or "High Profile."
- However, if you just want to playback the video on another device choose an option under the "Device" menu.
- More advanced options are offered for video and audio compression, quality, chapter divisions, etc. These can be left as the default.
To begin ripping, click “Start”.
- Progress will be shown on the bottom of the window.
- When HandBrake is done the Cocktail & Pineapple icon will appear to tell you its done.
4. Next you need to convert the HandBrake .m4v file to a .mov using MPEG Streamclip. To do so, open up MPEG Streamclip.

- Drag the m4v video file into the MPEG Streamclip window.
- Go to File > Export to QuickTime
- Set the Compression to "Apple ProRes422"
- Drag the quality bar to 100%
- Choose the frame size "(unscaled)"
- Click "Make Movie". Choose the path and file name and click Save.

Drag the video file into MPEG Streamclip. Click File > Export to QuickTime. Set the Compression setting to “Apple DV/DVCPRO – NTSC”. Drag the quality bar to 100%. Choose the frame size to be “320 x 240 (unscaled)”. Click “Make Movie”. Choose the path and file name and click save.
5. Import into Final Cut Pro. To do so, open Final Cut Pro. Click File > Import > Files
Available link for download